I noticed it's been almost a year since I last posted.
My house project took over most of my spare time, and any wrench time has mostly gone toward maintenance of my 2 trucks.
I have finished the second rear wheel, and am deciding whether to start on the front wheels or start working on the transmission.
I have found a few parts for the future, and need to sell off some of the parts I will not be using.
Purchased new bolts to hook the hub to the brake drum because most of the ones I had were bent. I found them on a ford site for a good price, I just have to cut 1/4" off the end to make them the correct length.
I also found a set of "hubcaps" that were in pretty good shape.
I also bought some Jaxon wheel clamps since I was short one. These are painted black and not chrome like the others so I will have to fix that.
I received some sheet metal working tools for Christmas so maybe I'll try to fab a body panel.
Wednesday, February 5, 2014

Sunday, March 3, 2013
One down three to go
Well I got the wheel ready to go back on. Here it is with the masking removed.

The next challenge was to get the "rust ring" put on the tire. At least for now it isn't rusty anymore.
Check out the sidewalls on that ancient tire. It's funny what a lot of years can do to your tire.

What a sweet moment, mounting the wheel back on the car. I painted the brake drum with heat resistant black paint. The can said it would be good for 1200 degrees F. I figured that if the drums got that hot I would be in trouble. At least I wouldn't have to worry about a brake fluid fire as these are all mechanical.
It took awhile to find 6 straight hub bolts, and I had to run the die over them to be able to put the nuts on. I think I will buy new hub bolts for all the wheels.
I used my big spanner to install it so I could get the full retro feeling.

And here it is with the tire installed. Hooray!! One done only three more to go.

I took the other back wheel off tonight and started to work on it. Hopefully it won't take as long as this one did.

The next challenge was to get the "rust ring" put on the tire. At least for now it isn't rusty anymore.
Check out the sidewalls on that ancient tire. It's funny what a lot of years can do to your tire.

What a sweet moment, mounting the wheel back on the car. I painted the brake drum with heat resistant black paint. The can said it would be good for 1200 degrees F. I figured that if the drums got that hot I would be in trouble. At least I wouldn't have to worry about a brake fluid fire as these are all mechanical.
It took awhile to find 6 straight hub bolts, and I had to run the die over them to be able to put the nuts on. I think I will buy new hub bolts for all the wheels.
I used my big spanner to install it so I could get the full retro feeling.

And here it is with the tire installed. Hooray!! One done only three more to go.

I took the other back wheel off tonight and started to work on it. Hopefully it won't take as long as this one did.
Sunday, February 17, 2013
Back to the wheels
I have been putting a lot of time into refinishing the wheels. After sanding for way too many hours I was able to put a couple coats of finish on the wood. I really like the natural look of the wood so I am avoiding paint for now. I decided if it looked crummy I could always paint over it later.
I neglected to get pictures of the finished wood before I masked it off to paint the steel. I'll put them up after the paint dries and I can strip off the masking.
I painted the "rust ring" and the wheel today.


I neglected to get pictures of the finished wood before I masked it off to paint the steel. I'll put them up after the paint dries and I can strip off the masking.
I painted the "rust ring" and the wheel today.


I used a paint called Hammered Black, I figured it would go well with the "hammered" metal on the wheel.
Get to work
I was reminded by a friend at work that I had not posted for a looooong time. I have been doing some work on the car but haven't posted.
I needed a link between the brake pedal and the actuator shafts. I initially found clevis ends that were for a go-cart that looked like they would work.
After building them I decided they would be too weak.
Next I found some clevis ends from a 28-34 Ford that looked much beefier. Being a Ford guy at heart I decided this would be good for the car. :)
 A comparison between the two linkages, you can see the top is much larger.

You can see the new end is much stronger. Note the thickness around the pin hole. The rod is also 5/16 instead of 1/4.
I needed a link between the brake pedal and the actuator shafts. I initially found clevis ends that were for a go-cart that looked like they would work.
After building them I decided they would be too weak.
Next I found some clevis ends from a 28-34 Ford that looked much beefier. Being a Ford guy at heart I decided this would be good for the car. :)


You can see the new end is much stronger. Note the thickness around the pin hole. The rod is also 5/16 instead of 1/4.
Friday, December 28, 2012
Rim work
The previous owner had sort of modified some carriage bolts to mount the tires. They didn't work well but the idea was good.
I spent some time with a grinder and did some more modification.


The middle bolt is the unmodified one, the two sides are with some grinder work.
They fit snug in the rim now.
I also had some damage on the rim that needed some attention.
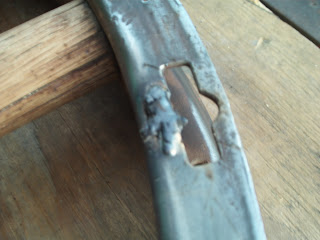
This area on the rim was badly beat up. A little work after I get a new Dremel should have it looking like new.
I spent some time with a grinder and did some more modification.


The middle bolt is the unmodified one, the two sides are with some grinder work.
They fit snug in the rim now.
I also had some damage on the rim that needed some attention.

This area on the rim was badly beat up. A little work after I get a new Dremel should have it looking like new.
Tire ring problem solved
As you saw in a previous post the ring that goes on the tire was missing some connection pieces.
I built a piece to tie the two ends together and welded it to the rim.


I built a piece to tie the two ends together and welded it to the rim.

Here is the piece I put in, it still needs a little work.

Here it is closed up. I may drill the new part so it can be pinned to keep it from shifting while it is installed.
To see what I needed to make I pulled the other rear to compare. Oddly enough it was totally different.

Here is the other side, it must be from a different year or model.
Monday, December 17, 2012
Back to work
Well I noticed it's been over a month since I posted anything. I had not done much but a little rust cleanup on the wheel.
I had some time this weekend to do some work so I decided to drill my driveway to mount my vise and bender.

The bolts don't line up too well with my vise since they were drilled to match the bender, but it's good enough.
After taking the wire wheel to the rust on the inside of this ring the piece that ties the ends together fell off.

The rivets just pulled through. I guess the heads rusted away.

So I put some new weld heads on them. With a little grinding it will be good as new.

I'm not exactly sure what is supposed to go in here. Hopefully one of the other wheels has this piece so I can make a replacement.
I was also able to straighten out the edges of the ring so that they were more parallel.
I had some time this weekend to do some work so I decided to drill my driveway to mount my vise and bender.

The bolts don't line up too well with my vise since they were drilled to match the bender, but it's good enough.
After taking the wire wheel to the rust on the inside of this ring the piece that ties the ends together fell off.

The rivets just pulled through. I guess the heads rusted away.

So I put some new weld heads on them. With a little grinding it will be good as new.

I'm not exactly sure what is supposed to go in here. Hopefully one of the other wheels has this piece so I can make a replacement.
I was also able to straighten out the edges of the ring so that they were more parallel.
Thursday, November 8, 2012
Sandblasting
Well I dug out my sandblaster to see how it would do on the wheels. I forgot how you end up with sand in your hair and ears. I also remembered why you don't do your blasting in shorts and T-shirt.
I need to bring my compressor from the other house, the little one I borrowed from my dad won't keep up.
Either I am going to have to build a box to blast parts or go back to the wire wheel.

This is what the rim half that attaches to the tire looks like. It took a long time to clean up that little area. This area must collect water as it is quite pitted.

You can see the difference between the blasted and unblasted areas.

Even with a bunch of blasting it is hard to get this old paint off.
All blasting was done with actual sand as media, I wonder if a different media would work better?
I need to bring my compressor from the other house, the little one I borrowed from my dad won't keep up.
Either I am going to have to build a box to blast parts or go back to the wire wheel.

This is what the rim half that attaches to the tire looks like. It took a long time to clean up that little area. This area must collect water as it is quite pitted.

You can see the difference between the blasted and unblasted areas.

Even with a bunch of blasting it is hard to get this old paint off.
All blasting was done with actual sand as media, I wonder if a different media would work better?
Wednesday, October 31, 2012
Old tools
Here are a couple of spanners I picked up when I got the car.

The large one is about 18" long, the smaller one is about 11".
These look as if they also saw service as hammers since the back of the upper jaw is marked up.
I guess the more uses you get from one tool the fewer tools you need to carry.

The large one is about 18" long, the smaller one is about 11".
These look as if they also saw service as hammers since the back of the upper jaw is marked up.
I guess the more uses you get from one tool the fewer tools you need to carry.
Wheel work
I finally took the lazy mans way and went with the power sander.
I had this at my other house that I'm getting ready to sell. I decided it was time to bring it home.

Much easier on the arms.
I had this at my other house that I'm getting ready to sell. I decided it was time to bring it home.

Much easier on the arms.
Tuesday, October 23, 2012
Air compressors
A couple of old mechanical "Air Compressors" that I picked up when I got the car. I thought these looked cool and would be a great accessory for the car. They still need hoses so I will keep my eyes open for something I can use.

This is the proper Low Tech way to inflate your tires.

This is the proper Low Tech way to inflate your tires.
Wednesday, October 17, 2012
Tool of the week
I picked this up when I picked up the car.
The only reason I took it was because I didn't know what it was. Have you seen one before?


The only reason I took it was because I didn't know what it was. Have you seen one before?


Tuesday, October 16, 2012
More wheel work
After some reading I decided not to remove the spokes from the wheel. I did want to get behind the hub to make it easier to refinish. The hub is very tight and took some hammering to move. I got the backside even with the wood which moved the front away about 3/16". This was enough to get some sandpaper in for a light sanding. This will also be helpful for rust and old paint removal on the hub.


The hub moved back. This is in super tight, I guess there should be no wobble in this wheel.
After doing some reading I probably should treat the old paint as if it has lead.
Better safe than sorry.

A nice little gap to help the refinishing.

The hub moved back. This is in super tight, I guess there should be no wobble in this wheel.
After doing some reading I probably should treat the old paint as if it has lead.
Better safe than sorry.
Friday, October 12, 2012
Wheel work
I took one of my rear wheels apart today. These are very odd. The hub bolts directly to the brake drum and squeezes the spokes together in the center.
The tire has a 2 piece rim that slides off the metal rim that the spokes are attached to.
The bolts holding the tire part of the rim on appear to be carrage bolts that have the edges shaved off.

After the drum was removed. The wood looks old and dry with some old paint in evidence.

A carrage bolt with the sides ground down. All the extras in the can still need to be modified.

The wood is looking old. I have to decide if I should pull them out to refinish.

A little rusty but looks to be in good condition.

Not sure what this is about. It would be nice to see a picture of what it should look like.
This is the part of the rim that the tire goes on.
So is it a good idea to take out the spokes or would I hate myself for being so stupid?
Dave
The tire has a 2 piece rim that slides off the metal rim that the spokes are attached to.
The bolts holding the tire part of the rim on appear to be carrage bolts that have the edges shaved off.

After the drum was removed. The wood looks old and dry with some old paint in evidence.

A carrage bolt with the sides ground down. All the extras in the can still need to be modified.

The wood is looking old. I have to decide if I should pull them out to refinish.

A little rusty but looks to be in good condition.

Not sure what this is about. It would be nice to see a picture of what it should look like.
This is the part of the rim that the tire goes on.
So is it a good idea to take out the spokes or would I hate myself for being so stupid?
Dave
Thursday, October 11, 2012
Boattails
Well I was looking at some Boattail Speedsters and here is a few I found.

Here is a nice wooden one but I would still need to come up with the cowl for mine.

This would give a rumble seat for your friends. I'm not excited about the ribbed look.

This has an all wood body and looks like you could make it out of an old canoe.

This has to be the all time classic of Boattails. In the movie it was made from an old boat. If I could copy a car perfectly this would be my first choice.

Here is a nice wooden one but I would still need to come up with the cowl for mine.

This would give a rumble seat for your friends. I'm not excited about the ribbed look.

This has an all wood body and looks like you could make it out of an old canoe.

This has to be the all time classic of Boattails. In the movie it was made from an old boat. If I could copy a car perfectly this would be my first choice.
Monday, October 8, 2012
Tire removal, what's back there anyway
I took the rear tire off last night. After putting on the puller it just came off by hand. Maybe I should have been ready for that to happen since the wheel nut was only hand tight. Everything looks to be in good condition with the brake pads looking pretty thick. It looks like it has been worked on as all the linkage pins have been replaced. The wheel only has 1 bolt holding it together but I have a can full of hub and rim bolts.

The spokes on this need some work. The brake drum looks to be in good condition.

Here you have your classic inside/outside brake setup. The outer band is the main brake, and the inner one is for the parking brake.

Here is something you don't see anymore, tires from Wards.

Here we have a pair of your classic vacuum fuel pumps. I don't think these will work for me because of how high my carbs are. I guess I will be looking for an electric fuel pump.
I had a suggestion to gut one and put the electric pump inside to keep the vintage look.
I think it is a better idea to sell them to fund a new fuel pump.

Here is what the previous owner had hanging in his garage. Perhaps this is what he envisioned for his final configuration.
My co-worker John said this is to "old" a look for my car and suggested a "boat tail" would be a better look. We'll see what the future brings, there is enough mechanical work to do before I start on the body.

The spokes on this need some work. The brake drum looks to be in good condition.

Here you have your classic inside/outside brake setup. The outer band is the main brake, and the inner one is for the parking brake.

Here is something you don't see anymore, tires from Wards.

Here we have a pair of your classic vacuum fuel pumps. I don't think these will work for me because of how high my carbs are. I guess I will be looking for an electric fuel pump.
I had a suggestion to gut one and put the electric pump inside to keep the vintage look.
I think it is a better idea to sell them to fund a new fuel pump.

Here is what the previous owner had hanging in his garage. Perhaps this is what he envisioned for his final configuration.
My co-worker John said this is to "old" a look for my car and suggested a "boat tail" would be a better look. We'll see what the future brings, there is enough mechanical work to do before I start on the body.
Friday, October 5, 2012
No work today
No time to work on the car today. I was called to do work on my day off, I guess that will help pay for parts!
My other project I am involved with is getting my old house ready to sell. It's good that I'm almost done so I can have my weekends free for my new project.
As I look at the speedster pictures posted below I wonder how much of the body in the back is metal and how much is wood.
My dad is a great wood worker, and I would rather work with metal. Hopefully I will be able to get him excited about helping.
For the car, one of the tires is totally shot. There is a large section of tread missing. You would think that a tire should last 80+ years without failing. :)
Dave
My other project I am involved with is getting my old house ready to sell. It's good that I'm almost done so I can have my weekends free for my new project.
As I look at the speedster pictures posted below I wonder how much of the body in the back is metal and how much is wood.
My dad is a great wood worker, and I would rather work with metal. Hopefully I will be able to get him excited about helping.
For the car, one of the tires is totally shot. There is a large section of tread missing. You would think that a tire should last 80+ years without failing. :)
Dave
Thursday, October 4, 2012
HO motor??
I was looking at the carbs that are mounted and discovered they are Ford model 59. Research revealed that they are a 2 bbl unit used on 46-48 flathead V8 engines. Imagine 4 bbl of carburation feeding a 4 cyl engine, how intense.
There was also a set of old pistons in the boxes I brought home. Could it be that new "high compression" pistons were installed?
Who knows maybe the compression has been boosted beyond the 4.5 to 1 that the factory offered to something more reasonable. What a thrill to have more than the factory 35 HP. Can you imagine the excitement of perhaps 40 neck snapping horsepower!!!
I'll have to pull the plug next and see if I can make any discoveries. Does anyone have any tricks to take pictures inside the chamber without a scope?
Dave
There was also a set of old pistons in the boxes I brought home. Could it be that new "high compression" pistons were installed?
Who knows maybe the compression has been boosted beyond the 4.5 to 1 that the factory offered to something more reasonable. What a thrill to have more than the factory 35 HP. Can you imagine the excitement of perhaps 40 neck snapping horsepower!!!
I'll have to pull the plug next and see if I can make any discoveries. Does anyone have any tricks to take pictures inside the chamber without a scope?
Dave
Wednesday, October 3, 2012



Subscribe to:
Posts (Atom)